ISO/IEC 17025 Accredited Calibration Laboratory
Temprecord is accredited and [authorised] to issue IANZ endorsed calibration certificates for temperature and humidity calibrations for Temprecord data loggers. Note: Temperature and humidity calibrations certificates are issued as a combined or shared certificate, which includes 3-point correction for Temperature and 2-point correction for Humidity.
- For standard three point temperature calibrations the expanded uncertainty is 0.2 °C over the temperature range from -20 °C to +50 °C, or -40 °C to +50 °C for low temperature loggers, and 0.8 °C over the temperature range from (-196, -90 and -38 °C).
- Fahrenheit the expanded uncertainty is 0.36 °F over the temperature range from -4 °F to +122 °F, or -40 °F to +122 °F for low temperature loggers, and -320.8°F, -130°F and -36.4°F.
- All uncertainties are expressed at a 95% confidence level. The coverage factor is typically 2.0. and tested at 24±4°C Ambient temperature.
- The temperature scale used is ITS-90. Temperatures values on calibration certificates are printed in degrees °C and °F.
- Temprecord RH loggers are laboratory calibrated with an expanded uncertainty of 3% RH over the humidity range from 12% to 85% RH,, dry bulb temperature range [is 20 °C to 30 °C] and expanded uncertainty is expressed at a 95% confidence level. The coverage factor is k=2.
3-Point Calibration For Accuracy : Calibration Built into the Logger
The calibration laboratory techniques established for Temprecord ISO17025 accreditation have been developed to make 3 Point Calibration a standard process when manufacturing all General Use Scientific and RH data loggers.
After initial assembly all General Use, Scientific & RH data loggers are calibrated at -15 °C, 0 °C and +40 °C, or -38 °C, 0 °C and +40 °C for low temperature probes with the option of specified points such as -80 °C. This process provides an accuracy of within 0.2 °C (- 0.36 °F) across a range of -20 °C to +50 °C (-4 °F to +122 °F) or for low temperature probes -40 °C to +50 °C, (-40 °F to +122 °F). A range of -80°C, 0, 80°C provides an accuracy of within 0.8 °C.
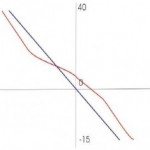
The graph to the left shows how a typical accuracy curve would look like from an un-calibrated data logger. The straight blue line through the middle represents what you would expect true accuracy to look like.
From a data logger showing results like this we would re-calibrate the data loggers programming at the three points: -15 °C, 0 °C and +40 °C, or -38 °C, 0 °C and +40 °C for low temperature probes.
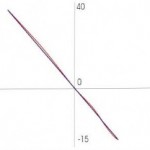
This second graph shows the accuracy curve after the computer has applied the correction values at each of the three temperature points. As can be seen, this process straightens out the accuracy curve dramatically giving the end-user an accurate product across the stated range.
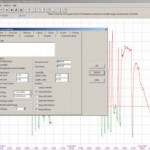
This level of accuracy in the data logger can only be achieved when the data logger’s software has the ability to have these correction factors applied to it.
Currently Temprecord is one of the few manufactures in the world that applies the correction data to the individual data logger economically.
Some manufacturers do provide calibration certificates but these certificates only provide the correction factors at any nominated points. They cannot make allowances for the correction.
Without this, a calibration certificate is only telling you how inaccurate your data logger really is.
Scope of Accreditation
Three Point Temperature Calibrations
| Calibration Temperature Range | Least Uncertainty of Calibrations (Best Measurement) | ||||
|---|---|---|---|---|---|
| For Data Loggers without probes fitted (Internal sensor) | |||||
| -15ºC to 40°C (5°F to 104°F) | ±0.061°C (routinely reported as ±0.2°C from -20°C to 50°C) | ||||
| For Data Loggers with probes fitted (External sensor) | |||||
| -15°C to 50°C (5°F to 122 °F) | ±0.056°C (routinely reported as ±0.2°C from -20°C to 50°C) in dry block calibrator. | ||||
| ±0.08°C (routinely reported as ±0.2°C from -20°C to 50°C) in stirred liquid baths. | |||||
| -15°C to 110°C (5°F to 230°F) | ±0.1°C (routinely reported as ±0.2°C from -20°C to 110°C) in stirred liquid baths. | ||||
| -38°C to 110°C (-36.4°F to 230°F) | ±0.2 °C (routinely reported as ±0.2°C from -40°C to 110°C) in stirred liquid baths. | ||||
| -90°C to 110°C (-130°F to 230°F) | ±0.51°C (routinely reported as ±0.8°C from -90°C to 110°C) in stirred liquid baths | ||||
| -196°C (-320.8°F) | ±0.63 °C (routinely reported as ±0.8°C) in liquid Nitrogen | ||||
Relative Humidity Calibrations & Re-Calibration to loggers
| Calibration Temperature Range | Least Uncertainty of Calibrations (Best Measurement) | |||
|---|---|---|---|---|
| Calibration over the entire range from 12% to 85% RH | ||||
| 12% to 85% RH | 3.0% RH at a dry bulb temperature between 20°C and 30°C and a dew point range of -6°C to 23°C | |||
Temprecord Certification and Accreditation
Certification Documents
NIST Traceability
Temprecord are able to provide NIST traceability. [This is realized by sending a reference thermometer standard to be calibrated at a duel NIST and ISO17025 accredited calibration laboratory in the USA.]

This document was prepared by International Accreditation New Zealand (IANZ) – a crown entity established under the Testing Laboratory Registration Act, 1972.
IANZ Accreditation – your assurance of technical competence – PDF ![]()
This document outlines the role of independent testing laboratories in the provision of certification services.
The document was prepared by International Accreditation New Zealand (IANZ) – a crown entity established under the Testing Laboratory Registration Act, 1972.
